What is SDKMAN? In this article, I will explore how SDKMAN works and how it can be used to manage multiple versions of Java in Linux. Installing SDKMAN To use SDKMAN, you must first install… More

📝 InfoTec 📝
What is SDKMAN? In this article, I will explore how SDKMAN works and how it can be used to manage multiple versions of Java in Linux. Installing SDKMAN To use SDKMAN, you must first install… More

In this demo, I will use WSO2 MI-4.2.0, WSO2 MI-Dashboard-4.2.0, and Keycloak-12.0.4. Assume that you have already added the required configurations in the wso2 MI 4.2.0 to connect the MI servers with the dashboard. If… More

Cryptographic Processes Process of converting ordinary plain text into unintelligible text and vice-versa. The science of encrypting and decrypting information is called cryptography. The primary purpose of cryptography is to making difficult for unauthorized third… More

In this blog post, I’ll guide you through the process of setting up Oracle AQ with the WSO2 MI server based on my own experiences.
If you require you can refer to the below steps and commands to configure the Oracle 12c docker image.
sudo docker search oracle --filter=STARS=17sudo docker pull truevoly/oracle-12csudo docker imagesora_data) in the /var/local/ pathsudo mkdir -p /var/local/ora_data/var/local/ora_data/sudo chmod -R 777 /var/local/ora_data/sudo docker run \
-p 1521:1521 -p 5500:5500 \
-e ORACLE_SID=sys \
-e ORACLE_PWD=oracle \
-e ORACLE_MEM=4000 \
-v /opt/oracle/ora_data \
-d \
docker.io/truevoly/oracle-12c:latest/bin/bash) within the specified Docker containersudo docker exec -it c5223891ab6e /bin/bash
create user testuser identified by oracle;

grant connect to testuser;

grant all privileges to testuser;grant all on sys.dbms_aq to testuser;
grant all on dbms_aqadm to testuser;
grant all on dbms_aqin to testuser;EXEC dbms_aqadm.create_queue_table('testqt', 'SYS.AQ$_JMS_TEXT_MESSAGE')
EXEC dbms_aqadm.create_queue('testq','testqt')
EXEC dbms_aqadm.start_queue('testq')set serverout onDECLARE
enqueue_options DBMS_AQ.ENQUEUE_OPTIONS_T;
message_properties DBMS_AQ.MESSAGE_PROPERTIES_T;
message_handle RAW (16);
msg SYS.AQ$_JMS_TEXT_MESSAGE;
BEGIN
msg := SYS.AQ$_JMS_TEXT_MESSAGE.construct;
msg.set_text('This is a test message!');
DBMS_AQ.ENQUEUE (
queue_name => 'testq',
enqueue_options => enqueue_options,
message_properties => message_properties,
payload => msg,
msgid => message_handle);
COMMIT;
END;
/DECLARE
dequeue_options DBMS_AQ.DEQUEUE_OPTIONS_T;
message_properties DBMS_AQ.MESSAGE_PROPERTIES_T;
message_handle RAW (16);
msg SYS.AQ$_JMS_TEXT_MESSAGE;
BEGIN
DBMS_AQ.dequeue (
queue_name => 'testq',
dequeue_options => dequeue_options,
message_properties => message_properties,
payload => msg,
msgid => message_handle);
DBMS_OUTPUT.PUT_LINE(msg.TEXT_VC);
COMMIT;
END;
/Add the below configurations into the deployment.toml file which resides in the <MI_HOME>/conf directory.
[[transport.jms.sender]]
name = "commonJmsSenderConnectionFactory"
parameter.db_url="jdbc:oracle:thin:@localhost:1521/xe" ### DB url with SID
parameter.initial_naming_factory = "oracle.jms.AQjmsInitialContextFactory"
parameter.connection_factory_name = "QueueConnectionFactory"
parameter.connection_factory_type = "queue"
parameter.naming_security_principal="testuser" ### user
parameter.naming_security_credential="oracle"  ### password

[[transport.jms.sender]]
name = "commonJmsSenderConnectionFactory"
parameter.db_url="jdbc:oracle:thin:@localhost:1521/xe" ### DB url with SID
parameter.initial_naming_factory = "oracle.jms.AQjmsInitialContextFactory"
parameter.connection_factory_name = "TopicConnectionFactory"
parameter.connection_factory_type = "topic"
parameter.naming_security_principal="testuser" ### user
parameter.naming_security_credential="oracle" ### password[[transport.jms.listener]]
name = "AqQueueConnectionFactory"
parameter.initial_naming_factory = "oracle.jms.AQjmsInitialContextFactory"
parameter.db_url="jdbc:oracle:thin:@localhost:1521/xe" ### DB url with SID
parameter.connection_factory_name = "QueueConnectionFactory"
parameter.connection_factory_type = "queue"
parameter.naming_security_principal="testuser" ### user
parameter.naming_security_credential="oracle" ### password
[[transport.jms.listener]]
name = "AqTopicConnectionFactory"
parameter.initial_naming_factory = "oracle.jms.AQjmsInitialContextFactory"
parameter.db_url="jdbc:oracle:thin:@localhost:1521/xe" ### DB url with SID
parameter.connection_factory_name = "TopicConnectionFactory"
parameter.connection_factory_type = "topic"
parameter.naming_security_principal="testuser" ### user
parameter.naming_security_credential="oracle" ### password<?xml version="1.0" encoding="UTF-8"?>
<proxy xmlns="http://ws.apache.org/ns/synapse"
name="TestProxy"
transports="http https"
startOnLoad="true">
<description/>
<target>
<inSequence>
<log>
<property name="in" value="==== IN ====="/>
</log>
<property name="FORCE_SC_ACCEPTED" value="true" scope="axis2"/>
<property name="OUT_ONLY" value="true"/>
<send>
<endpoint>
<address uri="jms:/Queues/testq?transport.jms.ConnectionFactoryJNDIName=QueueConnectionFactory&java.naming.factory.initial=oracle.jms.AQjmsInitialContextFactory&transport.jms.DestinationType=queue&java.naming.security.principal=testuser&java.naming.security.credentials=oracle&db_url=jdbc:oracle:thin:@localhost:1521/xe"/>
</endpoint>
</send>
</inSequence>
</target>
</proxy><?xml version="1.0" encoding="UTF-8"?>
<inboundEndpoint xmlns="http://ws.apache.org/ns/synapse" name="DurableTopicInboundListener" sequence="request" onError="fault" protocol="jms" suspend="false">
<parameters>
<parameter name="interval">1000</parameter>
<parameter name="transport.jms.Destination">Queues/testq</parameter>
<parameter name="transport.jms.CacheLevel">1</parameter>
<parameter name="transport.jms.ConnectionFactoryJNDIName">QueueConnectionFactory</parameter>
<parameter name="sequential">true</parameter>
<parameter name="java.naming.factory.initial">oracle.jms.AQjmsInitialContextFactory</parameter>
<parameter name="java.naming.provider.url">jdbc:oracle:thin:@localhost:1521/testdb</parameter>
<parameter name="java.naming.security.principal">testuser</parameter>
<parameter name="java.naming.security.credentials">oracle</parameter>
<parameter name="db_url">jdbc:oracle:thin:@localhost:1521/xe</parameter>
<parameter name="transport.jms.SessionAcknowledgement">AUTO_ACKNOWLEDGE</parameter>
<parameter name="transport.jms.SessionTransacted">false</parameter>
<parameter name="transport.jms.ConnectionFactoryType">queue</parameter>
</parameters>
</inboundEndpoint>Deploy the sequence as below
Eg:
<?xml version="1.0" encoding="UTF-8"?>
<sequence name="request" trace="disable" xmlns="http://ws.apache.org/ns/synapse">
<log level="full"/>
  <drop/>
</sequence>
Fault sequence will consume when it sends the incorrect message
<sequence xmlns="http://ws.apache.org/ns/synapse" name="fault">
    <!-- Log the message at the full log level with the ERROR_MESSAGE and the ERROR_CODE-->
    <log level="full">
        <property name="MESSAGE" value="Executing default 'fault' sequence"/>
        <property name="ERROR_CODE" expression="get-property('ERROR_CODE')"/>
        <property name="ERROR_MESSAGE" expression="get-property('ERROR_MESSAGE')"/>
    </log>
    <!-- Drops the messages by default if there is a fault -->
    <drop/>
</sequence>Once you have done all the required configurations you can test the scenario.
Eg:
curl --location 'http://localhost:8290/services/TestProxy' \
--header 'Content-Type: application/xml' \
--data '<soapenv:Envelope xmlns:soapenv="http://schemas.xmlsoap.org/soap/envelope/" xmlns:wsa="http://www.w3.org/2005/08/addressing">
    <soapenv:Body>
        <m0:getQuote xmlns:m0="http://services.samples">
            <m0:request>
                <m0:symbol>test</m0:symbol>
            </m0:request>
        </m0:getQuote>
    </soapenv:Body>
</soapenv:Envelope>'
Hope you find this blog useful! Now, it’s your turn to dive in and explore further.
Cheers !!


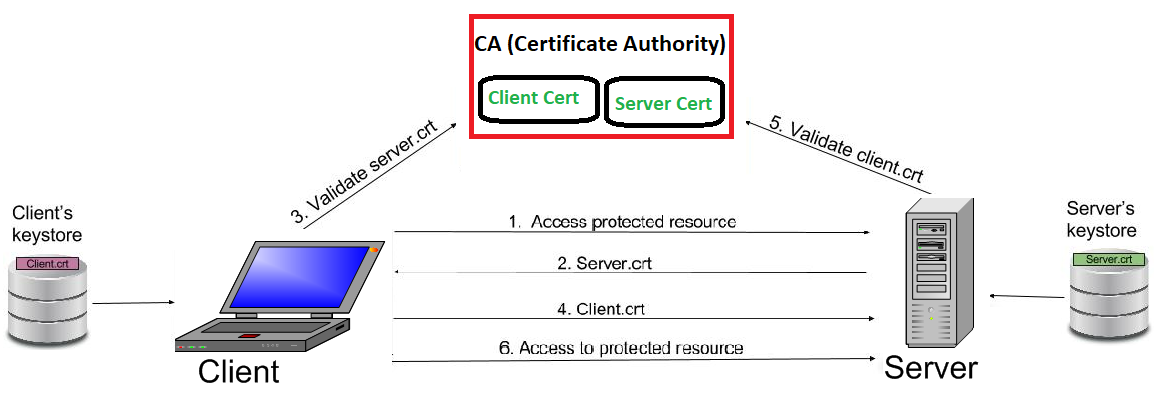
2-way SSL


| Advantages | Disadvantages |
|---|---|


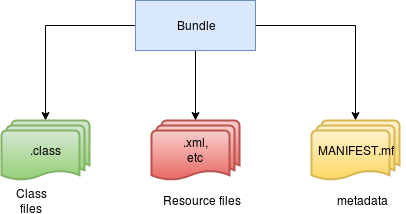
Manifest-Version: 1.0
Bnd-LastModified: 1618862826488
Build-Jdk: 1.8.0_281
Built-By: Maneesha
Bundle-Description: Simple User Registration Module with REST API.
Bundle-DocURL: http://www.wso2.org/
Bundle-License: http://www.apache.org/licenses/LICENSE-2.0.txt
Bundle-ManifestVersion: 2
Bundle-Name: org.wso2.carbon.identity.user.registration.smu.core
Bundle-SymbolicName: org.wso2.carbon.identity.user.registration.smu.co
re
Bundle-Vendor: WSO2
Bundle-Version: 0.0.1
Created-By: Apache Maven Bundle Plugin
DynamicImport-Package: *
Export-Package: org.wso2.carbon.identity.user.registration.smu.core;Class=org.wso2.carbon.user.core.service.RealmService)";effective:=act
ive,osgi.service;filter:="(objectClass=org.wso2.carbon.utils.Configur
ationContextService)";effective:=active,osgi.ee;filter:="(&(osgi.ee=J
avaSE)(version=1.8))"
Service-Component: OSGI-INF/org.wso2.carbon.identity.framework.user.re
gistration.smu.core.component.xml
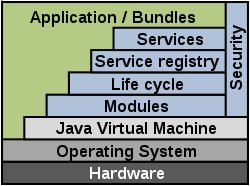
Tool: Bnd-3.2.0.201605172007What is Modularity?
What is a Module?
Advantages of modularity
Parties in Service

-XX:+HeapDumpOnOutOfMemoryError option can be added to generate a heap dump on OutOfMemoryError. -XX:HeapDumpPath=path. jmap -dump:format=b,file=heap.bin <pid> “<pid>” can be replaced with the process id of the applicationjmap -dump:live,format=b,file=heapDump2.hprof 102707jcmd 12587 GC.heap_dump /tmp/dump.hprofAs with jmap, the dump generated is in binary format.


It is:
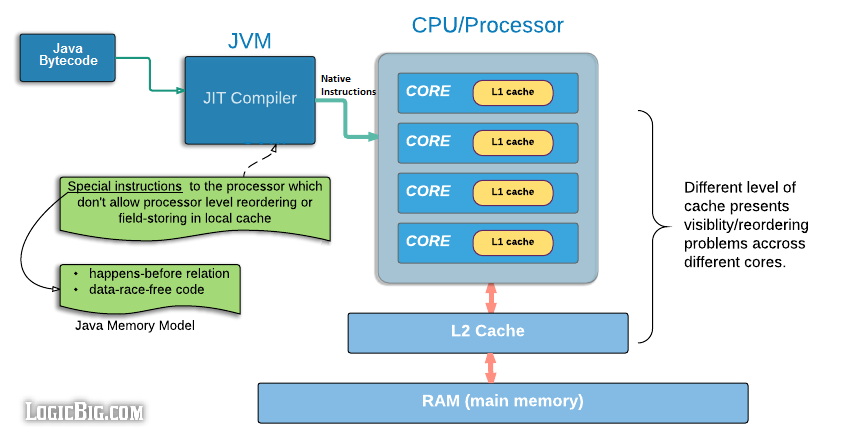
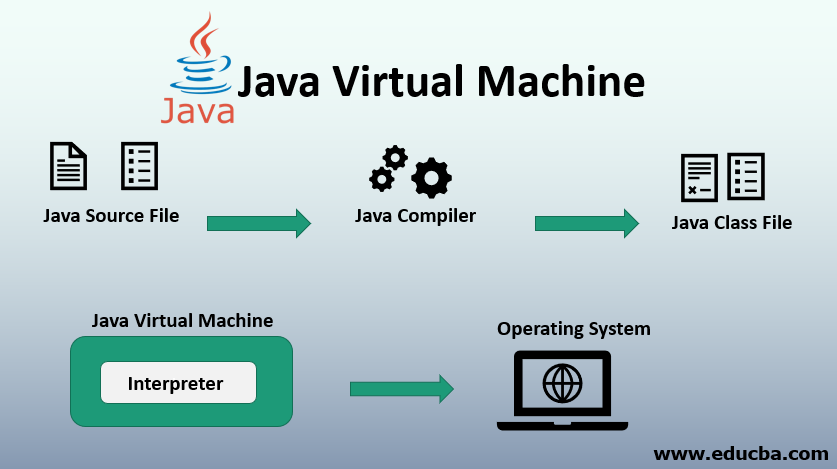
JVM,
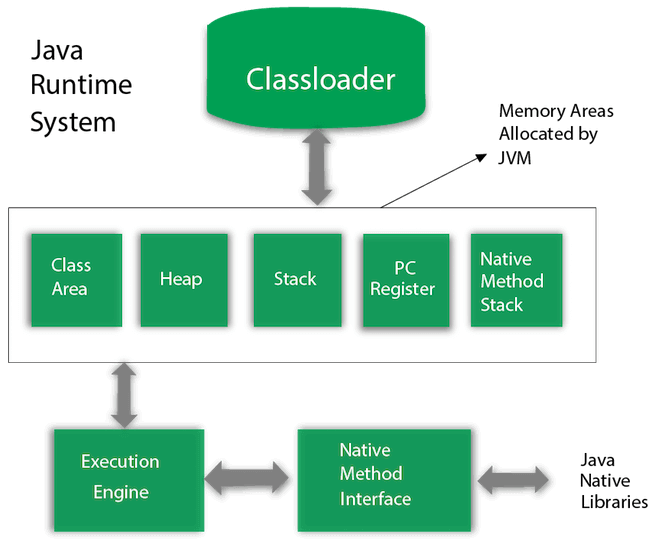
The java memory model specification specifies how and when a thread can see the value of a shared variable modified by another thread and how to access the shared variable when necessary
eg:
If you run the program in one JVM then you pick that program and pick it into another JVM, the program output is exactly the same.


01. Generate DeadLock by following below sample code.
public class DeadlockP {

    public static void main(String[] args) throws Exception {

        Object resourceA = new Object();
        Object resourceB = new Object();

        Thread threadLockingResourceAFirst = new Thread(new DeadlockRunnable(resourceA, resourceB));
        Thread threadLockingResourceBFirst = new Thread(new DeadlockRunnable(resourceB, resourceA));

        threadLockingResourceAFirst.start();
        Thread.sleep(500);
        threadLockingResourceBFirst.start();
    }

    private static class DeadlockRunnable implements Runnable {

        private final Object firstResource;
        private final Object secondResource;

        public DeadlockRunnable(Object firstResource, Object secondResource) {
            this.firstResource = firstResource;
            this.secondResource = secondResource;
        }

        @Override
        public void run() {

            try {
                synchronized(firstResource) {
                    printLockedResource(firstResource);
                    Thread.sleep(1000);
                    synchronized(secondResource) {
                        printLockedResource(secondResource);
                    }
                }
            } catch (InterruptedException e) {
                System.out.println("Exception occurred: " + e);
            }
        }

        private static void printLockedResource(Object resource) {
            System.out.println(Thread.currentThread().getName() + ": locked resource -> " + resource);
        }
    }
}
layani@layani-ThinkPad-X1-Carbon-Gen-8:~/Documents/java$ javac DeadlockP.java
layani@layani-ThinkPad-X1-Carbon-Gen-8:~/Documents/java$ java DeadlockP
Thread-0: locked resource -> java.lang.Object@5a590c27
Thread-1: locked resource -> java.lang.Object@7ec5aaaa
02. Capturing the Java Thread Dump using JPS command
03. Get the PID for our application.
layani@layani-ThinkPad-X1-Carbon-Gen-8:~/Documents/java$ jps
3095 CShell.jar
727233 DeadlockP
727284 Jps
04. Capture the thread dump using jstack.
05. Store the result in a text file
layani@layani-ThinkPad-X1-Carbon-Gen-8:~/Documents/java$ jstack -l 727233 > DeadLock-thread-dump.txt
2021-08-07 18:22:08
Full thread dump OpenJDK 64-Bit Server VM (25.282-b08 mixed mode):
"Attach Listener" #13 daemon prio=9 os_prio=0 tid=0x00007f51b0001000 nid=0xb1e95 waiting on condition [0x0000000000000000]
   java.lang.Thread.State: RUNNABLE
   Locked ownable synchronizers:
	- None

"DestroyJavaVM" #12 prio=5 os_prio=0 tid=0x00007f520000a800 nid=0xb18c2 waiting on condition [0x0000000000000000]
   java.lang.Thread.State: RUNNABLE
   Locked ownable synchronizers:
	- None
"Thread-1" #11 prio=5 os_prio=0 tid=0x00007f5200117800 nid=0xb18d6 waiting for monitor entry [0x00007f51b70e5000]
   java.lang.Thread.State: BLOCKED (on object monitor)
	at DeadlockP$DeadlockRunnable.run(DeadlockP.java:34)
	- waiting to lock <0x000000076db5fea8> (a java.lang.Object)
	- locked <0x000000076db5feb8> (a java.lang.Object)
	at java.lang.Thread.run(Thread.java:748)
   Locked ownable synchronizers:
	- None
"Thread-0" #10 prio=5 os_prio=0 tid=0x00007f5200116800 nid=0xb18d5 waiting for monitor entry [0x00007f51b71e6000]
   java.lang.Thread.State: BLOCKED (on object monitor)
	at DeadlockP$DeadlockRunnable.run(DeadlockP.java:34)
	- waiting to lock <0x000000076db5feb8> (a java.lang.Object)
	- locked <0x000000076db5fea8> (a java.lang.Object)
	at java.lang.Thread.run(Thread.java:748)
   Locked ownable synchronizers:
	- None
"Service Thread" #9 daemon prio=9 os_prio=0 tid=0x00007f52000f2000 nid=0xb18d3 runnable [0x0000000000000000]
   java.lang.Thread.State: RUNNABLE
   Locked ownable synchronizers:
	- None
"C1 CompilerThread3" #8 daemon prio=9 os_prio=0 tid=0x00007f52000cd000 nid=0xb18d2 waiting on condition [0x0000000000000000]
   java.lang.Thread.State: RUNNABLE
   Locked ownable synchronizers:
	- None
"C2 CompilerThread2" #7 daemon prio=9 os_prio=0 tid=0x00007f52000ca800 nid=0xb18d1 waiting on condition [0x0000000000000000]
   java.lang.Thread.State: RUNNABLE
   Locked ownable synchronizers:
	- None
"C2 CompilerThread1" #6 daemon prio=9 os_prio=0 tid=0x00007f52000c9000 nid=0xb18d0 waiting on condition [0x0000000000000000]
   java.lang.Thread.State: RUNNABLE
   Locked ownable synchronizers:
	- None
"C2 CompilerThread0" #5 daemon prio=9 os_prio=0 tid=0x00007f52000c6000 nid=0xb18cf waiting on condition [0x0000000000000000]
   java.lang.Thread.State: RUNNABLE
   Locked ownable synchronizers:
	- None
"Signal Dispatcher" #4 daemon prio=9 os_prio=0 tid=0x00007f52000c0000 nid=0xb18ce runnable [0x0000000000000000]
   java.lang.Thread.State: RUNNABLE
   Locked ownable synchronizers:
	- None
"Finalizer" #3 daemon prio=8 os_prio=0 tid=0x00007f520008f000 nid=0xb18cd in Object.wait() [0x00007f51ec2ad000]
   java.lang.Thread.State: WAITING (on object monitor)
	at java.lang.Object.wait(Native Method)
	- waiting on <0x000000076db08ee0> (a java.lang.ref.ReferenceQueue$Lock)
	at java.lang.ref.ReferenceQueue.remove(ReferenceQueue.java:144)
	- locked <0x000000076db08ee0> (a java.lang.ref.ReferenceQueue$Lock)
	at java.lang.ref.ReferenceQueue.remove(ReferenceQueue.java:165)
	at java.lang.ref.Finalizer$FinalizerThread.run(Finalizer.java:216)
   Locked ownable synchronizers:
	- None
"Reference Handler" #2 daemon prio=10 os_prio=0 tid=0x00007f520008a800 nid=0xb18cc in Object.wait() [0x00007f51ec3ae000]
   java.lang.Thread.State: WAITING (on object monitor)
	at java.lang.Object.wait(Native Method)
	- waiting on <0x000000076db06c00> (a java.lang.ref.Reference$Lock)
	at java.lang.Object.wait(Object.java:502)
	at java.lang.ref.Reference.tryHandlePending(Reference.java:191)
	- locked <0x000000076db06c00> (a java.lang.ref.Reference$Lock)
	at java.lang.ref.Reference$ReferenceHandler.run(Reference.java:153)
   Locked ownable synchronizers:
	- None
"VM Thread" os_prio=0 tid=0x00007f5200081000 nid=0xb18cb runnable
"GC task thread#0 (ParallelGC)" os_prio=0 tid=0x00007f520001f800 nid=0xb18c3 runnable
"GC task thread#1 (ParallelGC)" os_prio=0 tid=0x00007f5200021800 nid=0xb18c4 runnable
"GC task thread#2 (ParallelGC)" os_prio=0 tid=0x00007f5200023000 nid=0xb18c5 runnable
"GC task thread#3 (ParallelGC)" os_prio=0 tid=0x00007f5200025000 nid=0xb18c6 runnable
"GC task thread#4 (ParallelGC)" os_prio=0 tid=0x00007f5200026800 nid=0xb18c7 runnable
"GC task thread#5 (ParallelGC)" os_prio=0 tid=0x00007f5200028800 nid=0xb18c8 runnable
"GC task thread#6 (ParallelGC)" os_prio=0 tid=0x00007f520002a000 nid=0xb18c9 runnable
"GC task thread#7 (ParallelGC)" os_prio=0 tid=0x00007f520002c000 nid=0xb18ca runnable
"VM Periodic Task Thread" os_prio=0 tid=0x00007f52000f4800 nid=0xb18d4 waiting on condition
JNI global references: 5

Found one Java-level deadlock:
=============================
"Thread-1":
  waiting to lock monitor 0x00007f51b8006568 (object 0x000000076db5fea8, a java.lang.Object),
  which is held by "Thread-0"
"Thread-0":
  waiting to lock monitor 0x00007f51b8003ac8 (object 0x000000076db5feb8, a java.lang.Object),
  which is held by "Thread-1"

Java stack information for the threads listed above:
===================================================
"Thread-1":
	at DeadlockP$DeadlockRunnable.run(DeadlockP.java:34)
	- waiting to lock <0x000000076db5fea8> (a java.lang.Object)
	- locked <0x000000076db5feb8> (a java.lang.Object)
	at java.lang.Thread.run(Thread.java:748)
"Thread-0":
	at DeadlockP$DeadlockRunnable.run(DeadlockP.java:34)
	- waiting to lock <0x000000076db5feb8> (a java.lang.Object)
	- locked <0x000000076db5fea8> (a java.lang.Object)
	at java.lang.Thread.run(Thread.java:748)

Found 1 deadlock.
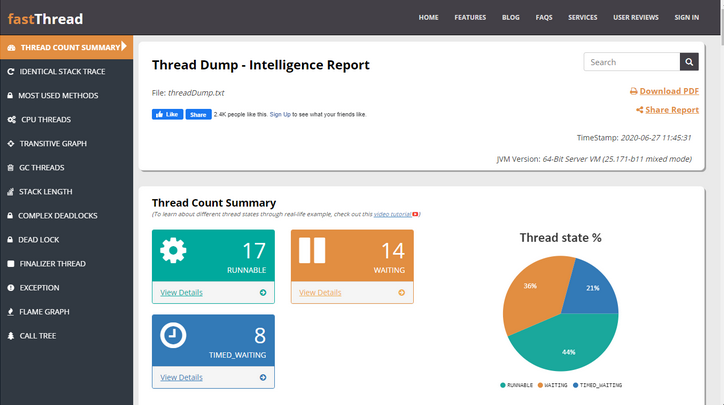
Name
it can provide useful information if developers include a meaningful thread name
Priority (prior)
the priority of the thread
Java ID (tid)
the unique ID given by the JVM
Native ID (nid)
the unique ID given by the OS, useful to extract correlation with CPU or memory processing
State
the actual state of the thread
Stack trace
the most important source of information to decipher what is happening with our application
ps -mo pid,lwp,stime,time,cpu -C java
layani@layani-ThinkPad-X1-Carbon-Gen-8:~/Documents/java$ ps -mo pid,lwp,stime,time,cpu -C java
    PID     LWP STIME     TIME CPU
   727233       - 17:56 00:00:00   -
      -  727233 17:56 00:00:00   -
      -  727234 17:56 00:00:00   -
      -  727235 17:56 00:00:00   -


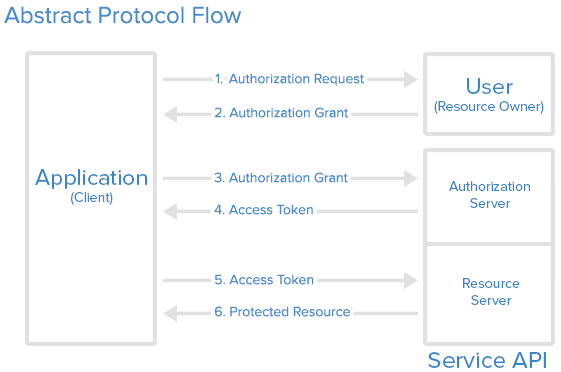
The access token provided by any other grant flow has an expiration time. The client can use the refresh token as a grant to fetch the access token after the access token is expired.
A refresh token generally has a longer expiry duration. With the refresh token, the client can get the access token without reauthorization from the resource owner.
The client needs to provide refresh_token, client_id and client_secret while using this flow.
URL: https://auth-server.com/token
request params:
grant_type: refresh_token
client_id: 29352915982374239857
client_secret: uf1ie98f2kda2vu25uye3k1h
The response of API is the same as the access token.
This auth flow is used to grant the token outside the context of a user. The trusted client can use this to access resources that are not related to a user.
URL: https://auth-server.com/token
request params:
grant_type: client_credential
client_id: 29352915982374239857
client_secret: uf1ie98f2kda2vu25uye3k1h
The response of API is the same as the access token
URL: https://auth-server.com/auth
request params:
response_type=code
client_id=29352915982374239857
redirect_uri=https://client.com/redirect
scope=create+delete
state=xcoiv98y2kd22vusuye3kch
With the above request, code is returned in response to the provided redirect URL.
URL: https://auth-server.com/token
request params:
code: nao1n3f
grant_type: authorization_code
client_id: 29352915982374239857
client_secret: uf1ie98f2kda2vu25uye3k1h
The response of the API will provide a token:
{
"access_token":"K1Z04lLdZ1S0pIMF09DI1FTZjJ1jmOO06",
"token_type":"bearer",
"expires_in":3600,
"refresh_token":"IzH6bFh6laf6gQ6TgA3sj19mfgA5egZx9a",
"scope":"create delete"
}
The client can use the “ access_token” to access the resource.