Configuring Oracle AQ with WSO2 Micro Integrator

In this blog post, I’ll guide you through the process of setting up Oracle AQ with the WSO2 MI server based on my own experiences.

  • WSO2 Product : WSO2 MI: 4.1.0 (U2 level 79)
  • DB version: Oracle 12c
  • OS : Ubuntu 22.04.2 LTS
  • JDK: openjdk version “11.0.21”
  • SQL developer: Version 23.1.0.097
  • WSO2 MI Installation:
    • Install and set up WSO2 MI on your server.

If you require you can refer to the below steps and commands to configure the Oracle 12c docker image.

sudo docker search oracle --filter=STARS=17
sudo docker pull truevoly/oracle-12c
sudo docker images
sudo mkdir -p /var/local/ora_data
sudo chmod -R 777 /var/local/ora_data/
sudo docker run \
-p 1521:1521 -p 5500:5500 \
-e ORACLE_SID=sys \
-e ORACLE_PWD=oracle \
-e ORACLE_MEM=4000 \
-v /opt/oracle/ora_data \
-d \
docker.io/truevoly/oracle-12c:latest
sudo docker exec -it c5223891ab6e /bin/bash

  • Username: sys
  • Password: oracle
  • SID: xe
  • Port: 1521
  • Role: SYSDBA
create user testuser identified by oracle;

grant connect to testuser;

grant all privileges to testuser;
grant all on sys.dbms_aq to testuser;

grant all on dbms_aqadm to testuser;

grant all on dbms_aqin to testuser;
EXEC dbms_aqadm.create_queue_table('testqt', 'SYS.AQ$_JMS_TEXT_MESSAGE')

EXEC dbms_aqadm.create_queue('testq','testqt')

EXEC dbms_aqadm.start_queue('testq')
set serverout on
If needed you can simply open two SQL developer instances and directly push the messages to the queue and then receive the messages.
  • For that, you can use the below to send a message to the queue directly.
DECLARE
enqueue_options DBMS_AQ.ENQUEUE_OPTIONS_T;
message_properties DBMS_AQ.MESSAGE_PROPERTIES_T;
message_handle RAW (16);
msg SYS.AQ$_JMS_TEXT_MESSAGE;
BEGIN
msg := SYS.AQ$_JMS_TEXT_MESSAGE.construct;
msg.set_text('This is a test message!');
DBMS_AQ.ENQUEUE (
queue_name => 'testq',
enqueue_options => enqueue_options,
message_properties => message_properties,
payload => msg,
msgid => message_handle);
COMMIT;
END;
/
DECLARE
dequeue_options DBMS_AQ.DEQUEUE_OPTIONS_T;
message_properties DBMS_AQ.MESSAGE_PROPERTIES_T;
message_handle RAW (16);
msg SYS.AQ$_JMS_TEXT_MESSAGE;
BEGIN
DBMS_AQ.dequeue (
queue_name => 'testq',
dequeue_options => dequeue_options,
message_properties => message_properties,
payload => msg,
msgid => message_handle);
DBMS_OUTPUT.PUT_LINE(msg.TEXT_VC);
COMMIT;
END;
/

Add the below configurations into the deployment.toml file which resides in the <MI_HOME>/conf directory.

[[transport.jms.sender]]
name = "commonJmsSenderConnectionFactory"
parameter.db_url="jdbc:oracle:thin:@localhost:1521/xe" ### DB url with SID
parameter.initial_naming_factory = "oracle.jms.AQjmsInitialContextFactory"
parameter.connection_factory_name = "QueueConnectionFactory"
parameter.connection_factory_type = "queue"
parameter.naming_security_principal="testuser" ### user
parameter.naming_security_credential="oracle"  ### password

[[transport.jms.sender]]
name = "commonJmsSenderConnectionFactory"
parameter.db_url="jdbc:oracle:thin:@localhost:1521/xe" ### DB url with SID
parameter.initial_naming_factory = "oracle.jms.AQjmsInitialContextFactory"
parameter.connection_factory_name = "TopicConnectionFactory"
parameter.connection_factory_type = "topic"
parameter.naming_security_principal="testuser" ### user
parameter.naming_security_credential="oracle"  ### password
[[transport.jms.listener]]
name = "AqQueueConnectionFactory"
parameter.initial_naming_factory = "oracle.jms.AQjmsInitialContextFactory"
parameter.db_url="jdbc:oracle:thin:@localhost:1521/xe"  ### DB url with SID
parameter.connection_factory_name = "QueueConnectionFactory"
parameter.connection_factory_type = "queue"
parameter.naming_security_principal="testuser" ### user
parameter.naming_security_credential="oracle"  ### password

[[transport.jms.listener]]
name = "AqTopicConnectionFactory"
parameter.initial_naming_factory = "oracle.jms.AQjmsInitialContextFactory"
parameter.db_url="jdbc:oracle:thin:@localhost:1521/xe"  ### DB url with SID
parameter.connection_factory_name = "TopicConnectionFactory"
parameter.connection_factory_type = "topic"
parameter.naming_security_principal="testuser" ### user
parameter.naming_security_credential="oracle"  ### password
<?xml version="1.0" encoding="UTF-8"?>
<proxy xmlns="http://ws.apache.org/ns/synapse"
       name="TestProxy"
       transports="http https"
       startOnLoad="true">
   <description/>
   <target>
      <inSequence>
         <log>
            <property name="in" value="==== IN ====="/>
         </log>
         <property name="FORCE_SC_ACCEPTED" value="true" scope="axis2"/>
         <property name="OUT_ONLY" value="true"/>
         <send>
            <endpoint>
               <address uri="jms:/Queues/testq?transport.jms.ConnectionFactoryJNDIName=QueueConnectionFactory&amp;java.naming.factory.initial=oracle.jms.AQjmsInitialContextFactory&amp;transport.jms.DestinationType=queue&amp;java.naming.security.principal=testuser&amp;java.naming.security.credentials=oracle&amp;db_url=jdbc:oracle:thin:@localhost:1521/xe"/>
            </endpoint>
         </send>
      </inSequence>
   </target>
</proxy>
<?xml version="1.0" encoding="UTF-8"?>
 <inboundEndpoint xmlns="http://ws.apache.org/ns/synapse" name="DurableTopicInboundListener" sequence="request" onError="fault" protocol="jms" suspend="false">
    <parameters>
       <parameter name="interval">1000</parameter>
       <parameter name="transport.jms.Destination">Queues/testq</parameter>
       <parameter name="transport.jms.CacheLevel">1</parameter>
       <parameter name="transport.jms.ConnectionFactoryJNDIName">QueueConnectionFactory</parameter>
       <parameter name="sequential">true</parameter>
       <parameter name="java.naming.factory.initial">oracle.jms.AQjmsInitialContextFactory</parameter>
       <parameter name="java.naming.provider.url">jdbc:oracle:thin:@localhost:1521/testdb</parameter>
      <parameter name="java.naming.security.principal">testuser</parameter>
      <parameter name="java.naming.security.credentials">oracle</parameter>
      <parameter name="db_url">jdbc:oracle:thin:@localhost:1521/xe</parameter>
       <parameter name="transport.jms.SessionAcknowledgement">AUTO_ACKNOWLEDGE</parameter>
       <parameter name="transport.jms.SessionTransacted">false</parameter>
       <parameter name="transport.jms.ConnectionFactoryType">queue</parameter>
    </parameters>
 </inboundEndpoint>
  • Then it will engage when it sends the correct message.  
Eg: 
<?xml version="1.0" encoding="UTF-8"?>
<sequence name="request" trace="disable" xmlns="http://ws.apache.org/ns/synapse">
<log level="full"/>
  <drop/>
</sequence>

Fault sequence will consume when it sends the incorrect message

<sequence xmlns="http://ws.apache.org/ns/synapse" name="fault">
<!-- Log the message at the full log level with the ERROR_MESSAGE and the ERROR_CODE-->
<log level="full">
<property name="MESSAGE" value="Executing default 'fault' sequence"/>
<property name="ERROR_CODE" expression="get-property('ERROR_CODE')"/>
<property name="ERROR_MESSAGE" expression="get-property('ERROR_MESSAGE')"/>
</log>
<!-- Drops the messages by default if there is a fault -->
<drop/>
</sequence>
  • Additionally, you need to add the below jar files to the wso2mi-4.1.0-home/lib directory. 
    • If you need you can use jars which I used for the testings from here.
  1. aqapi.jar
  2. jmscommon.jar
  3. jta.jar
  4. ojdbc7.jar

Once you have done all the required configurations you can test the scenario.

Eg:  
curl --location 'http://localhost:8290/services/TestProxy' \
--header 'Content-Type: application/xml' \
--data '<soapenv:Envelope xmlns:soapenv="http://schemas.xmlsoap.org/soap/envelope/" xmlns:wsa="http://www.w3.org/2005/08/addressing">
    <soapenv:Body>
        <m0:getQuote xmlns:m0="http://services.samples"> 
            <m0:request>
                <m0:symbol>test</m0:symbol>
            </m0:request>
        </m0:getQuote>
    </soapenv:Body>
</soapenv:Envelope>'

Hope you find this blog useful! Now, it’s your turn to dive in and explore further.

Cheers !!

Use Multiple Java versions using SDKMAN

What is SDKMAN?

  • SDKMAN is a popular command-line tool for managing multiple versions of Java and other software development kits (SDKs).
  • It was created to simplify the process of installing, managing, and switching between different versions of SDKs.
  • With this tool, developers can easily manage multiple versions of Java on their development machines.
  • SDKMAN supports a wide range of SDKs, including Java, Groovy, Scala, Kotlin, and many others.
  • Also, this SDKMAN is a community-driven project that is open-source and free to use.
  • It is available for different operating systems such as Linux, macOS, and Windows.

In this article, I will explore how SDKMAN works and how it can be used to manage multiple versions of Java in Linux.

Installing SDKMAN

To use SDKMAN, you must first install it on your system.

To install SDKMAN, open a terminal window and enter the following command

curl -s "https://get.sdkman.io" | bash

This command downloads the SDKMAN installation script and executes it on your system.

initialize SDKMAN

Use the below command to initialize the SDKMAN on your system.

source "$HOME/.sdkman/bin/sdkman-init.sh"

You can check the version with the below command.

SDK version

Once the installation is complete, you can use the SDK command to manage your SDKs.

List the available java versions

you can list the available Java versions that can be installed using SDKMAN by using the following command.

sdk list java

This command will display a list of Java versions that are available for installation, along with their respective identifiers, descriptions, and release dates.

For example, the output may look something like this

Installing Java using SDKMAN

To install a specific version of Java using SDKMAN, you can use the following command:

sdk install java

This can be replaced with the version and respective identifier of Java you want to install.

For example, to install Java 11, you can use the following command:

sdk install java 11.0.19-amzn

SDKMAN downloads and installs the specified version of Java on your system. You can verify that the installation was successful by running the below command.

java -version

You can change the default java version in your system as well as it can be changed the java version in runtime(Change the Java version in the current shell session only)

If you need to set the installed java version as default, you can set it by responding to the below question

Do you want java 11.0.19-amzn to be set as default? (Y/n): Y
Switching between Java versions

Once you have installed multiple versions of Java using SDKMAN, you can easily switch between them using the below command.

sdk use java <version that u want to use>

Replace this with the version of Java you want to use with the identifier.

For example, to switch to Java 11, you can use the following command

sdk use java 11.0.19-amzn

With SDKMAN you can set the specified version of Java as the default version.

sdk default java <version>
Managing Java versions

You can switch Java version easily with SDKMAN. For that, you only need to install the required version via SDK man and use that java version as explained above.

 Uninstall unwanted JDK versions

You can easily uninstall the specified version of Java as below.

sdk uninstall java 17.0.0-zulu

SDKMAN simplifies the process of managing software development kits and saves developers time and effort.

If you are a Java developer, SDKMAN is a tool you should definitely check out.🤞🎉

How to configure SSO for the WSO2 MI Dashboard 4.2.0 with KeyCloak

In this demo, I will use WSO2 MI-4.2.0, WSO2 MI-Dashboard-4.2.0, and Keycloak-12.0.4.

Assume that you have already added the required configurations in the wso2 MI 4.2.0 to connect the MI servers with the dashboard.

If not follow the steps here to configure the MI servers to publish data to the MI dashboard.

Configure Keycloak

  • Download the Keycloak standalone distribution from here.
  • After a successful download, extract the archive and navigate to <keycloak>/bin directory.
  • Then open a command prompt/terminal window and execute the relevant command to start the keycloak server
On macOS/Linux
sh standalone.sh
on Windows
standalone.bat

If you need to understand more about configuring and starting Keycloak please refer to this official guidance.

After successfully starting the Keyclock server, you will be able to access it via the browser with the below URL.

http://localhost:8080/auth

After login there, you can navigate to the Administration Console which has a similar UI as below.

In the Administration Console UI, you can list all the required Endpoint URLs and data to configure OpenID Connect in our Identity Providers by clicking the OpenID Endpoint Configuration (Master > Configure > Realm Settings > Endpoints )

Otherwise, by navigating http://localhost:8080/auth/realms/master/.well-known/openid-configuration you can get those Endpoint URLs.

As we need those URLs for the configurations later, make sure to keep a note of them.

In this demo, we will be using the existing Master realm to create required Clients, Users, and Roles in the Keycloak server

Register OIDC Client in the Keycloak server

Click on the Master > Configure > Clients and click Create button to add a new client as shown below.

Add the following values and click save.

  • Client ID: wso2mi
  • Client Protocol: openid-connect

Then add the following configuration values to configure the wso2mi client in the Keycloak server.

After adding the required values, click save.

Credentials of WSO2MI Client in Keycloak

Navigate to the Credentials tab of our WSO2 MI client in the Keycloak server and note down the value of the client secret.

Add Role for WSO2MI Client in Keycloak

Then click on the Roles tab and Click on Add Role to create a testUser Role.

Save the changes.

After that, click on the Mappers tab, to configure a claim mapping to send and expose our

Builtin Mappers of Keycloak

Created Roles through the OIDC SSO flow and via the User Info endpoint.

Click on Add Builtin and enable the client roles in the prompted screen and click Save.

Client Roles Mapper of WSO2MI Client in Keycloak

Edit the Client Roles mapper with the following properties and click save

Client ID: wso2mi

Multivalued: true

Token Claim Name: roles

Claim JSON Type: String

Add to ID token: true

Add to access token: true

Add to userinfo: true

User Registration

You can create a new user in the Keycloak server as below.

For that, go to the left Navigation Panel > Master > Configure >Manage > Users section.

Click on Add User to add a new user with the below details.

Username: keycloakuser

Email: key@cloak.com

First Name: Keycloak

Last Name: User

User Enabled: true

Email Verified: true

Save the changes

Move to the Credentials tab our created user and enter a password. Disable the Temporary Password and click on Set Password to save.

Then move to the Role Mappings tab to map the testUser (which we created earlier) with our User.

Select the WSO2MI client in the Client Roles dropdown and then it will list all the associated roles under the Available Roles section.

Select the testUser role and click on Add Selected to assign it.

Finally, it will show as above.

We have completed the keyclock configurations.

Configuring WSO2 Micro Integrator Dashboard

In order to use this SSO feature with the WSO2 MI dashboard, you need to upgrade Micro Integrator Dashboard to version 4.0.1 or above.

You need to do the SSO configuration in the MI Dashboard via the deployment.toml file.

For that, add the following configurations in to the MI_Dashboard_HOME/conf/deployment.toml file.

[sso]
enable = true
client_id = "wso2mi"
idp_url = "https://localhost:8443/auth/realms/master"
jwt_issuer = "https://localhost:8443/auth/realms/master"
resource_server_URLs = ["https://localhost:9743"]
sign_in_redirect_URL = "https://localhost:9743/sso"
sign_out_redirect_URL = "/"
jwks_endpoint = "https://localhost:8443/auth/realms/master/protocol/openid-connect/certs"
authorization_endpoint = "https://localhost:8443/auth/realms/master/protocol/openid-connect/auth"
token_endpoint = "https://localhost:8443/auth/realms/master/protocol/openid-connect/token"
user_info_endpoint = "https://localhost:8443/auth/realms/master/protocol/openid-connect/userinfo"
revocation_endpoint = "https://localhost:8443/auth/realms/master/protocol/openid-connect/revoke"
end_session_endpoint = "https://localhost:8443/auth/realms/master/protocol/openid-connect/logout"
check_session_Iframe_endpoint = "https://localhost:8443/auth/realms/master/protocol/openid-connect/login-status-iframe.html"
admin_group_attribute = "groups"
admin_groups = ["admin", "tester"]
storage = "sessionStorage"
scope = ["openid", "profile"]
override_well_known_endpoint = true
[[sso.authorization_request.params]]
key = "app_id"
value = "C123d"

You can refer to this MI Dashboard Config Catalog to get more details about the parameters that can be used to configure the SSO.

Import the public certificate of the keyclock IDP to the client-trust store

Finally, you have to add the public certificate of the keyclock IDP to the client-trust store.

Import the Keycloak certificate into the WSO2 MI truststore

The default Keycloak keystore is application.keystore.

In a standalone setup, the application.keystore can be found in the <KEYCLOAK_HOME>/standalone/configuration directory.

Alternatively, you can use the following command to generate a self-signed certificate in Keycloak.

keytool -genkey -alias server -keyalg RSA -keysize 2048 -validity 3650 -keystore application.keystore -dname "CN=localhost,OU=Support,O=WSO2,L=Colombo,S=Western,C=LK" -storepass password -keypass password -noprompt -ext SAN=dns:localhost

The alias should be server

Export the certificate in application.keystore.

keytool -export -alias server -file keycloak.crt -keystore application.keystore -storepass password -noprompt

Import the certificate into the MI dashboard’s truststore.

keytool -import -trustcacerts -alias keycloak -file keycloak.crt -keystore client-truststore.jks -storepass wso2carbon -noprompt

Once you have imported the certificate to a client-trust store(MI_Dashboard_HOME/conf/security ), add the following configuration with the necessary changes to the deployment.toml file.

In this example, I have placed the JKS trust store file in the directory.

[truststore]
file_name = "conf/security/client-truststore.jks"
password = "wso2carbon"

All set now. Let’s try it out.

Start the keyclock IDP, MI server, and MI dashboard server.

Access the https://layani:9743/login URL via browser. If you have configured everything correctly you will be able to see the SSO feature enabled in the login page.

By clicking the Sign In with SSO, option, you will be redirected to the keyclock IDP server’s login page as below.

Encryption & Decryption

Cryptographic Processes

  • Process of converting ordinary plain text into unintelligible text and vice-versa.
  • The science of encrypting and decrypting information is called cryptography.
  • The primary purpose of cryptography is to making difficult for unauthorized third party to access and understand private communication between two parties. 
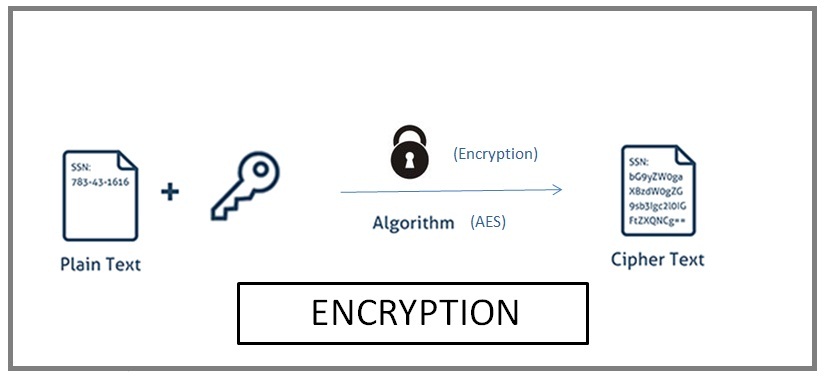
  • Encryption uses complex algorithms to convert the original message, or cleartext, to an encoded message, called ciphertext

What is Encryption?

  • Method which information is converted into secret code that hides the information’s true meaning.
  • So only authorized parties can understand the information
  • Here it is using a complex algorithm to convert an original message, or cleartext, to an encoded message
    • We called it ciphertext 
  • Formulas used to encode and decode messages are called encryption algorithms, or ciphers
Problem loading image

What is Decryption?

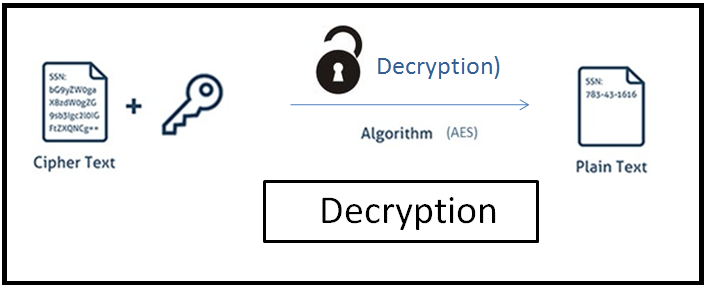
  • Decryption is a process that transforms encrypted information into its original format.
  • This Transforms information from unreadable format
    • called ciphertext to its original format which we called plaintext .
  • So this is inverse process of encryption. 
  • That means producing cleartext from ciphertext.
Problem loading image

Importance of encryption

  • Privacy
    • Encryption ensures that no one can read  data except the rightful data owner. 
    • This prevents attackers who is trying to read sensitive data.
  • Security: 
    • Encryption helps prevent data breaches. 
    • If your device is lost or stolen and its hard drive is properly encrypted, the data on that device will still be secure.
    •  Similarly, encrypted communications enable the communicating parties to exchange sensitive data without leaking the data.
  • Data integrity: 
    • Encryption also helps prevent malicious behavior such as on-path attacks.
    • When data is transmitted across the Internet, encryption  ensures that what the recipient receives has not been altered with on the way. 
  • Authentication: 
    • This allows users be sure that they are connected to the real website

Disadvantages of encryption

  • in some situations, encryption can keep the data’s owner from being able to access the data as well.
  • Key management is one of the biggest challenges of building an enterprise encryption and it adds extra complexity to the backup and restoration process also.
Symmetric Encryption (Secret Key Cryptography)

  • The two main kinds of encryption are symmetric encryption and asymmetric encryption.
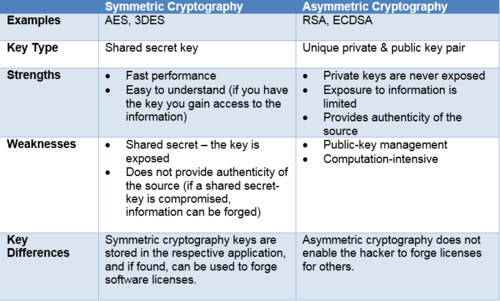
  • In symmetric encryption, there is only one key, and all communicating parties use the same (secret) key for both encryption and decryption. 
  •  The majority of the sensitive data sent in an SSL session is sent using secret key cryptography.
  • One of the major problems with secret key cryptography is the logistical issue of how to get the key from one party to the other without allowing access to an attacker. 
Asymmetric Encryption (Public Key Cryptography)

  •  Asymmetric encryption is also known as public key encryption.
  • In asymmetric, or public key, encryption, there are two keys: one key is used for encryption, and a different key is used for decryption. 
  • Public key cryptography requires extensive computations, making it very slow. It is therefore typically used only for encrypting small pieces of data, such as secret keys, rather than for the bulk of encrypted data communications.

Comparison Between Secret Key and Public Key Cryptography

Part 2: Software Licensing Security, What You Need to Know

Types of encryption

  • Cloud storage encryption
    • This service is offered by cloud storage providers.
    • This is use when data or text is transformed using encryption algorithms and is then placed in cloud storage
  • End-to-end encryption 
    • Also known as E2EE. 
    • Mostly this is use in Messaging apps such as Messenger , WhatsApp 
  • HTTPS
    • This enables website encryption by running HTTP over the SSL/TLS protocols.
    • To enable a web server to encrypt all content that it sends, a public key certificate must be installed.

What is an encryption algorithm?

  • An encryption algorithm is the method used to transform data into ciphertext. 
  • An algorithm will use the encryption key in order to alter the data in a predictable way.

Common encryption algorithms

Symmetric encryption algorithms
  • AES
    • Advanced Encryption Standard – (normally believe AES is resistant to all attacks which tries to decode messages (using all possible combinations of 128, 192, or 256-bit cryptosystems)
  • DES
    • Data Encryption Standard (is an outdated symmetric key method of data encryption. works by using the same key to encrypt and decrypt a message, so both the sender and the receiver must know and use the same private key)
  • 3-DES
    • Triple DES -(Triple DES uses three single 56-bit keys each. )
Asymmetric encryption algorithms 
  • RSA
    • RSA is popular due to its key length and therefore widely used for secure data transmission.(Many protocols, like Secure Shell (SSH), OpenPGP, Secure/Multipurpose Internet Mail Extensions (S/MIME) and Secure Sockets Layer (SSL)/TLS, rely on RSA for encryption and digital signature functions)
  • DH
    • Diffie–Hellman

How SSL Works

Risk management

CDR Ayam® on Twitter: "I edge all companies and institutions to enforce and  adopt a robust and a comprehensive #CyberSecurity policy framework.  #infosec #AI #IoT #cyberattacks #cybercrime #BeCyberSmart #Cyber  #informationsecurity… https://t.co/sNqguI96f2"
  • Risk management is part of information security .
  • That means preventing or reducing the unauthorized access to data, or data deletion, or data modification or any inconvenient thing do for the information
  • So this Information security’s primary focus on confidentiality, integrity, and availability of data 
  • We also known as the CIA triad

CIA Triad

  • Confidentiality
    • That means Computer-related assets are only available to authorized parties.
    • Only those parties should have access to something.
    • So Controlling the access based on the need is Confidentiality.
    • We use Authorization, authentication, encryption concepts to do this. 
  • Integrity
    • It Assure that the data or information systems can be trusted (hashing,signing) 
    • So the data should be Unmodified, Meaningful and usable
  • Availability
    • This means Data and information systems are available when required (monitoring, alerting,HA) 
    • So it needs to timely response to our requests
    • So it should Control concurrency, support for simultaneous access with proper deadlock, and access management.

What is SSL Means?

  • SSL which means Secure Sockets Layer
  • That means a protocol which we can use to establish authenticated and encrypted link between network.
  • This is a cryptographic protocol which used to provide security over internet communications
  • So this SSL provides a secure channel between two machines or devices operating over the internet or an internal network.
  • As this  SSL is a security protocol, it describe how algorithms should be used.
Example
  • One common example is SSL use to secure communication between a web browser and a web server.
  • That means HTTPS
  • Hyper text transfer protocol secure
  • As like HTTP, HTTPS is application layer protocol
  • So it is transferring web pages 
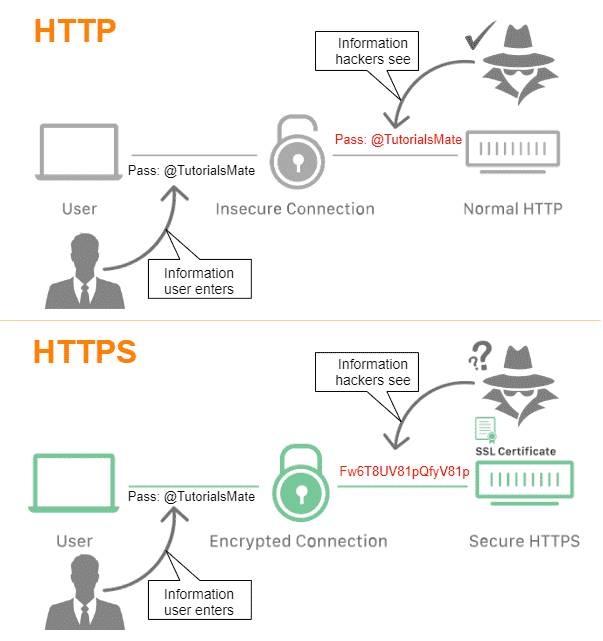
  • Using HTTP is not secure method. 
  • So we can use HTTPS which is secure protocol. So data will be encrypted and send.
  • So if attacker trying to get information, they can also get encrypted data.
  • Main thing is this HTTPS websites includes SSL/TLS certificate which is signed by a CA.
  • we can use this method for online payments like credit card transactions
Difference between HTTP and HTTPS - TutorialsMate

How Do I Know a Website is Secure with SSL?

image
URL with a pad lock is secure
URL with the other one is not secure
image
 Label HTTP Sites as ‘Not Secure.’
Label HTTPS Sites as ‘Secure.’

Why we use SSL?

  • Transferring sensitive information over a network can be risky 
    • Because You can’t always be sure the entity you are communicating is real one.
    • Also there  is possibility that an unauthorized third party is reading our data.
    • If attacker access our data, he can modify the data, before sending it to the receiver.
    • We can use this secure method to transfer sensitive data Like payments information.
    • In online transactions need to be more secure. So we need to use this kind of secure method to transfer information.
  • Protect the data of you and your users 
    • This will encrypt the data and transfer.
    • That means any malicious trying to get this data, he will also get the encrypted data.
    • Which is not usable.
    • Our users can feel safe that their data is in safe
  • Showing your users you can be trusted
    • This method is providing a SSL certificate
    • So users know they can trust you. 

How does the SSL provide data security?

  • Authenticating
    • It ensure the identity of the other party  which is authenticating the user.
    • Two parties need to authenticate weather they have access to communicate 
  • Establish an encrypted connection
    • Once these users are authenticated, SSL provides an encrypted connection between them for secure message transmission.
  • Send encrypted data
    • Here encryption algorithms are using with SSL
    • So This ensure that data doesn’t modified during transit.

What is SSL Handshake?

  • The SSL/TLS handshake enables client and server validate each other and start communicating through the secure SSL/TLS tunnel.
  • That means this handshake is done when client and server trying to communicate with each other for the first time
  • So before starting this SSL/TLS handshake that TCP connection need to be already established

Uses of SSL

  • Online credit card transactions or other online payments.
  • Office Communications Servers – Webmail servers like Outlook
  • Cloud-based computing platforms – virtualization applications
  • Hosting control panel login – like cPanel

1-Way and 2-Way SSL

1-way SSL

  • This is the common way to verify the authenticity of the website that you are trying to access.
  • In this authentication, the client is never verified.
  • It only validate the server, to ensure that the data is sending from the valid server.

2-way SSL

  • Here both the client and server exchange their certificates and verifies authenticity. 
  • After that Mutual trust is obtaining because  CA is  verifying both parties’ certificates.

What is a Certificate?

  • Certificate is a digitally signed document that binds the identity of entity and its public key.
  • SSL certificate we also known as a TLS or SSL/TLS certificate. 
    • Here TLS means -Transport Layer Security.
    • This is also a protocol we use for authentication and encryption. 
  • Normally we say Certificates are data files that have encrypted cryptographic keys with additional information such as domain name, host name, and server details of organization
  • Certificates can either be self-signed or issued by a Certification Authority (CA)
  • Certification Authorities are entities that are trusted to issue valid certificates for other entities

Certificate contents

  • Issuer
    • The issuer is the CA that issued the certificate.
    • If a user trusts the CA that issues a certificate, and if the certificate is valid, the user can trust the certificate.
  • Period of validity
    • A certificate has an expiration date, and this date is one piece of information that should be checked when verifying the validity of a certificate.
  • Subject
    • The subject field includes information about the entity that the certificate represents.
  • Subject’s public key
    • The primary piece of information that the certificate provides is the subject’s public key.
    • All the other fields are provided to ensure the validity of this key.
  • Signature
    • The certificate is digitally signed by the CA that issued the certificate.
    • The signature is created using the CA’s private key and ensures the validity of the certificate.
    • Because only the certificate is signed, not the data sent in the SSL transaction, SSL does not provide for non-repudiation.

How to get a certificate?

  • For the SSL certificate to be valid one, it need to obtain from a CA.
  • CA is an outside organization and it is a trusted third party
  • Client Generate the CSR which means certificate signing request
  • Then Send CSR to the CA that means certificate authority
  • The CA will also digitally sign the certificate with their own private key, allowing client devices to verify it. 
  • Once the certificate is issued, it needs to be installed and activated on the website’s server. 
  • So normally Web hosting services handle this for website operators.
  • Once it’s activated on the origin server, the website will be able to load over HTTPS 
  • So then all traffic to and from the website will be encrypted and secure.

SSL CAs

  • GoDaddy
  • HubSpot
  • Cloudflare

Self-signed SSL certificate

Is it ok to use a Self-Signed SSL? - Quora
  • Security certificate that is not signed by a certificate authority
  • As the name says, this is a certificate that is generated for internal purposes and is not issued by a CA.
  • website owner generates their own certificate,and  this certificate that is not signed by a certificate authority
  • These certificates are easy to make and do not need money
  • We can create them using some tools
    • OpenSSL,
    • Java’s keytool
    • Adobe Reader
    • WolfSSL
    • Apple’s Keychain
  • But there is no outside authority to verify the origin server
  • These self-signed SSL certificate are easy to customize
Difference Between Self-Signed and CA signed certificates

TCP and HTTP

What is a protocol?

Flateinfo.com| Believe in Sharing
  • A Protocol is a collection of rules and procedures for two computers to exchange information.
  • Rules are defined for each step and process during communication between two or more computers.
  • Networks have to follow these rules to successfully transmit data.

What is IP?

  • The Internet Protocol (IP) is the method for sending data from one device to another across the internet.
  • Every device has an IP address that uniquely identifies it and enables it to communicate with and exchange data with other devices connected to the internet.
  • IP is responsible for defining how applications and devices exchange packets of data with each other.
  • It is the principal communications protocol responsible for the formats and rules for exchanging data and messages between computers on a single network or several internet-connected networks.
  • IP is a network-layer protocol that provides a connection-less data transmission service that is used by TCP
  • Main purpose is to deliver data packets between the source application or device and the destination using methods and structures that place tags, such as address information, within data packets.
  • Data is transmitted link by link; an end-to-end connection is never set up during the call. The unit of data transmission is the datagram.

OSI Model

  • OSI Model – Open Systems Interconnection Model
  • It is a conceptual framework used to describe the functions of a networking system.

OSI Layers

  • Layer 7application layer – enables the user to interact with the application or network when the user wants to read messages, transfer files or engage in other network-related activities.
  • Layer 6presentation layer – translates or formats data for the application layer based on the semantics or syntax that the app accepts.
  • Layer 5session layer – sets up, coordinates and terminates conversations between apps.
  • Layer 4transport layer – handles transferring data across a network and providing error-checking mechanisms and data flow controls.
  • Layer 3network layer – moves data into and through other networks.
  • Layer 2data link layer – handles problems that occur as a result of bit transmission errors.
  • Layer 1physical layer – transports data using electrical, mechanical or procedural interfaces.

What Is TCP?

  • TCP/IP stands for Transmission Control Protocol/Internet Protocol
  • TCP defines how applications can create channels of communication across a network.
  • Data streaming from source to destination gets split up into chunks known as “packets” for more manageable transport.
  • Whenever you send or receive a packet of data, a host of information about that data rides along.
  • This includes information added by the TCP.
  • TCP ensure that all data sent in a stream moves from Point A to Point B in correct order and intact.

TCP Three-Way Handshake Process

  • TCP/IP uses a three-way handshake to establish a connection between a device and a server
  • It ensures multiple TCP socket connections can be transferred in both directions concurrently.
  • Both the device and server must synchronize and acknowledge packets before communication begins, then they can negotiate, separate, and transfer TCP socket connections.

Layers of the TCP/IP model

Common TCP/IP protocols and their ports

  • Hypertext Transfer Protocol – HTTP – 80
  • HTTP Secure – HTTPS – 443
  • File Transfer Protocol – FTP – 21
  • Secure Shell – SSH – 22
  • Telnet -23
  • Simple Mail Transfer Protocol – SMTP – 25

How does TCP/IP work?

Why is TCP/IP important?

  • Can be modified easily.
  • Compatible with all operating systems 
  • Compatible with all types of computer hardware and networks.
  • Highly scalable

Key features of the TCP/IP model

  • Supports flexible architecture
  • End-node verification 
  • Dynamic Routing

Pros and cons of TCP/IP

AdvantagesDisadvantages
  • Helps establish a connection between different types of computers

  • Works independently of the OS

  • Supports many routing protocols

  • Highly scalable

  • Can be operated independently

  • Lightweight

  • Slow Handshake

  • Slow Start

  • Complicated to set up and manage

  • Vulnerable to a synchronization attack

  • TCP/IP model vs OSI model

    Difference between TCP/IP model and OSI model

    An overview of HTTP

    What Is HTTP?

    • The Hypertext Transfer Protocol is an application protocol  that allows users to communicate data on the World Wide Web.

    How does HTTP work?

    Parts of the HTTP request

    • Protocol  – It can be HTTP/ HTTPS /FTP or any other protocol
    • Domain (Host) – Name that used to identify one or more IP address where resource is located.
    • Path – Specify the resource location on server
    • Parameters – Additional data use to identify the resource

    HTTP Request Methods

    • GET –  retrieve a specific resource or a collection of resources
    • POST – create a new resource
    • PUT –  update a specific resource
    • DELETE – remove a specific resource

    HTTP Response

    • 2xx success – indicates the action requested by the client was received, understood, and accepted.
    • 3xx redirection –  indicates the client must take additional action to complete the request.
    • 4xx client errors –  intended for situations in which the error seems to have been caused by the client.
    • 5xx server errors – indicate cases in which the server is aware that it has encountered an error or is otherwise incapable of performing the request.

    How HTTP and TCP use to establish connection and transfer data 

    HTTP and TCP 

    OSGI

    What Is OSGi?

    OSGi Working Group | The Eclipse Foundation
    • OSGi is a Java framework for developing and deploying modular software programs and libraries.
    • As a developer, you use the OSGi specification and tools to create one or more bundles.
    • OSGi defines the lifecycle for these bundles.
    • It also hosts them and supports their interactions in a container.
    • You can think of an OSGi container as roughly analogous to a JVM, with additional powers. Likewise, think of bundles as Java applications with unique abilities. Bundles run inside the OSGi container as client and server components.
    • In OSGi, multiple applications can exist within the same container: the OSGi bundle runtime environment. The container ensures each component is sufficiently isolated, and also has access to any dependencies it requires.

    OSGi overview

    1. OSGi framework
      • The framework is the runtime that implements and
        provides OSGi functionality.
    2. OSGi standard services
      • The standard services define reusable APIs for common tasks, such as Logging.

    Why we need OSGi?

    • It reduces complexity in almost all aspects of development
    • Code is easier to write and test, reuse is increased, build systems become significantly simpler
    • Deployment is more manageable

    Advantages of OSGi

    • You can install, uninstall, start, and stop different modules of your application dynamically without restarting the container.
    • Your application can have more than one version of a particular module running at the same time.
    • OSGi provides very good infrastructure for developing service-oriented applications, as well as embedded, mobile, and rich internet apps.

    Usage

    • Healthcare
    • Media Control Systems
    • Telecommunications
    • Enterprise Software Platforms
    • Robotics
    • mobile phones to the open-source Eclipse IDE

    OSGi containers

    • It is a Component framework.
    • Three popular open source OSGi containers:
      • Equinox – By Eclipse
      • Apache Felix – By Apache Software Foundation
      • Knopflerfish – By Makewave

    OSGI Architecture

    • Module Layer
      • The Bundle
      • Packaging and sharing the code
    • Lifecycle Layer
      • The Container
      • Managing an OSGi application
    • Service Layer
      • The system
      • How OSGi bundles communicate

    Module Layer (Bundle Layer)

    • OSGi lets you divide your Java application into bundles
    • Every bundle has a name and a version
    • Bundles can declare dependency on each-other
    • When you drop a bundle in an OSGi container, then the container handles the inter-dependencies automatically.
    Sample Manifest.MF file
    Manifest-Version: 1.0
    Bnd-LastModified: 1618862826488
    Build-Jdk: 1.8.0_281
    Built-By: Maneesha
    Bundle-Description: Simple User Registration Module with REST API.
    Bundle-DocURL: http://www.wso2.org/
    Bundle-License: http://www.apache.org/licenses/LICENSE-2.0.txt
    Bundle-ManifestVersion: 2
    Bundle-Name: org.wso2.carbon.identity.user.registration.smu.core
    Bundle-SymbolicName: org.wso2.carbon.identity.user.registration.smu.co
     re
    Bundle-Vendor: WSO2
    Bundle-Version: 0.0.1
    Created-By: Apache Maven Bundle Plugin
    DynamicImport-Package: *
    Export-Package: org.wso2.carbon.identity.user.registration.smu.core;Class=org.wso2.carbon.user.core.service.RealmService)";effective:=act
     ive,osgi.service;filter:="(objectClass=org.wso2.carbon.utils.Configur
     ationContextService)";effective:=active,osgi.ee;filter:="(&(osgi.ee=J
     avaSE)(version=1.8))"
    Service-Component: OSGI-INF/org.wso2.carbon.identity.framework.user.re
     gistration.smu.core.component.xml
    Tool: Bnd-3.2.0.201605172007

    What is Modularity?

    • Modularity is a software designing architecture. 
    • Modularity enables the program to separate the functionality of a large program into independent, interchangeable modules, in such a way that each contains everything necessary to execute only one aspect of the desired functionality.

    What is a Module?

    • Logically independent piece
    • Each module in the system has their own boundary and in a single module

    Advantages of modularity

    1. The module is small enough to understand and debug
    2. Easy to monitor, control and maintain
    3. Can be tested independently

     Life-cycle Layer

    • A Life-Cycle layer adds bundles that can be dynamically installed, started, stopped, updated and uninstalled.
    • Bundles rely on the module layer for class loading but add an API to manage the modules in run time.
    • The life cycle layer introduces dynamics that are normally not part of an application.
    • Extensive dependency mechanisms are used to assure the correct operation of the environment.
    • Life cycle operations are fully protected with the security architecture.

    l.png

    • INSTALLED
      • BundleContex.installBundle() , the operation creates a bundle in this state.
    • RESOLVED
      • All Java classes that the bundle needs are available. This state indicates that the bundle is either ready to be started or has stopped.
    • STARTING
      • The bundle is being started, the BundleActivator.start() the method has been called but the start method has not yet returned. When the bundle has an activation policy, the bundle will remain in the STARTING state until the bundle is activated according to its activation policy.
    • ACTIVE
      • The bundle has been successfully activated and is running; its Bundle Activator start method has been called and returned. If there is an error in the ACTIVE state it will go to the RESOLVED state again, this jumps to RESOLVED state because in that state all the dependencies are resolved so no need to jump to the INSTALLED state again.
    • STOPPING
      • The bundle is being stopped. The BundleActivator.stop() method has been called but the stop method has not yet returned.
    • UNINSTALLED
      • The bundle has been uninstalled. It cannot move into another state.

    Service Layer

    • Thus to provide the interaction between bundles, services are used.
    • Services are specified by the Java interface.

    Parties in Service

    • Service Provider
      • Bundles can implement this interface and register the service with the Service Registry.
    • Service Consumer
      • Clients of the service can find it in the registry

    Heap Dump

    What is a heap?

    • Heap space in Java is used for dynamic memory allocation for Java objects and JRE classes at the runtime.
    • Whenever we create a Java object by creating an instance of a class, it is always placed in an area known as the heap.
    • The heap gets created when the JVM starts up. 
    • It expands or shrinks during runtime to accommodate the objects created or destroyed in our application.
    • When the heap becomes full, the garbage collection process is run to collect the objects that are not referenced anymore.
    • SHALLOW HEAP: 
      • The amount of memory occupied by the object itself
      • The actual memory consumed by one object.
    • RETAINED HEAP: 
      • Amount of memory that will be freed when the particular object is garbage collected
      • The amount of memory that an object can be reclaimed,including the memory occupied by direct and indirect references.
      • normally we say it is a sum of shallow sizes of all objects in the retained set of that object.

    Key Features of Java Heap Memory

    • It’s accessed via complex memory management techniques that include,
      • Young Generation
      • Old or Tenured Generation
      • Permanent Generation
    • If heap space is full, Java throws java.lang.OutOfMemoryError
    • Access to this memory is relatively slower than stack memory
    • This memory, in contrast to stack, isn’t automatically deallocated.
    • It needs Garbage Collector to free up unused objects so as to keep the efficiency of the memory usage
    • Unlike stack, a heap isn’t threadsafe and needs to be guarded by properly synchronizing the code

    Types of Applications where Heap Size Matters

    • BigData analyzing
    • NoSQL Databases
    • Analytics
    • eCommerce
    Garbage Collection
    • Garbage Collection is process of reclaiming the runtime unused memory automatically
    • It is a form of automatic memory management
    • Garbage collection will free up the memory of the object that doesn’t have any reference.

    What is a heap dump?

    • Heap dumps contain a snapshot of all the live objects that are being used by a running Java application on the Java heap.
    • It contains information such as,
      • what are the objects in memory?
      • what values do they carry?
      • what is their size?
      • what other objects do they reference?

    Heap dumps formats:

    • Classic format
      • human-readable format (ascii text)
    • Portable Heap Dump (PHD) format
      • default (binary)

    Usage of heap dump analyzing

    • The JVM software allocates memory for objects from the heap for all class instances and arrays.
    • The garbage collector reclaims the heap memory when an object is no longer needed and there are no references to the object. 
    • By examining the heap you can locate where objects are created and find the references to those objects in the source.
    • So this heap dumps are very useful to troubleshoot memory-leak problems and optimize memory usage in Java applications.
    • Memory problems that can investigate using the heal dumps
      • Memory leaks
      • Garbage Collection problems
      • java.lang.OutOfMemoryError
    OutofMemory Error
    • Can be occurred due to the memory size that we already allocated for the application is not enough.
    • Because didn’t increase the heap size.

    What we are looking for in a Heap dump is:

    • Objects with high memory usage
    • Object graph to identify objects of not releasing memory
    • Reachable and unreachable objects

    How to Take Heap Dump

    • A JVM argument can be added to generate heap dump whenever an OutOfMemoryError occurs.
      • The -XX:+HeapDumpOnOutOfMemoryError option can be added to generate a heap dump on OutOfMemoryError.
    • By default, the heap dump is created in a file called java_pid pid .hprof in the working directory of the VM, but we can set an alternative path using the JVM option -XX:HeapDumpPath=path
    • Using a jmap tool available with JDK.
    • The following command can be executed from the command line:
      •  jmap -dump:format=b,file=heap.bin <pid> “<pid>” can be replaced with the process id of the application
    jmap -dump:live,format=b,file=heapDump2.hprof 102707
    • live: if set it only prints objects which have active references and discards the ones that are ready to be garbage collected. This parameter is optional
    • format=b: specifies that the dump file will be in binary format. If not set the result is the same
    • file: the file where the dump will be written to
    • pid: id of the Java process
    jcmd 12587 GC.heap_dump /tmp/dump.hprof

    As with jmap, the dump generated is in binary format.

    Leak Suspects Report

    Java Memory Model

    What is a JVM ?

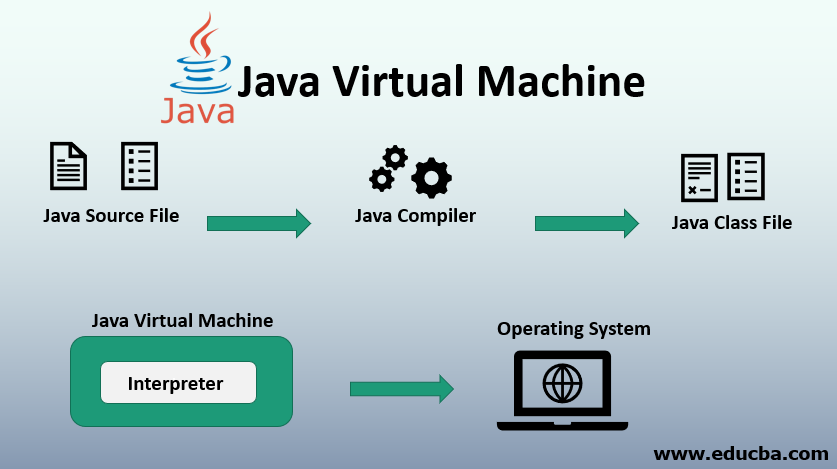
    Java Virtual Machine | Various Components of Java Virtual Machine
    • JVM – Java Virtual Machine
    • It is an abstract machine.
    • It is a specification that provides runtime environment in which java bytecode can be executed.
    • JVMs are available for many hardware and software platforms
    • However JVM is platform dependent.
    • Whenever we execute a Java program, a separate memory area is reserved for storing various parts of our application code which we roughly call JVM memory.
    • Without having a good understanding of how JVM actually consumes the memory and how garbage collector uses different parts of this volatile memory, we may miss some important considerations for better memory management, thus better performance.

    It is:

    1. A specification 
      • where working of Java Virtual Machine is specified.
      • But implementation provider is independent to choose the algorithm.
    2. An implementation 
      • Its implementation is known as JRE (Java Runtime Environment).
    3. Runtime Instance 
      • Whenever you write java command on the command prompt to run the java class, an instance of JVM is created.

    JVM,

    • Loads code
    • Verifies code
    • Executes code
    • Provides runtime environment
    JVM | Java Virtual Machine - Javatpoint

     What is Java Garbage collection ?

    •  Garbage collection is the mechanism used in Java to de-allocate unused memory.
    • In java, garbage means referenced objects.
    • Java applications obtain objects in memory as needed.
    • It is the task of garbage collection (GC) in the Java virtual machine (JVM) to automatically determine what memory is no longer being used by a Java application and to recycle this memory for other uses.

    What is a Memory Model?

    • The memory model describes possible behaviors of a program.
    • It describes thread interaction with memory.
    • It Changes in the ordering of reads and writes can cause race conditions. 
    • This memory model provides sequential consistency for data race free programs

    What is Java Memory Model?

    • Java Memory Model is the model that describes the behavior of memory in Java program.
    • It is a set of rules all JVMs have to follow to ensure correct working of our concurrent programs. 
    • it is specification which guarantees visibility of fields when you have reordered of instructions.

    The java memory model specification specifies how and when a thread can see the value of a shared variable modified by another thread and how to access the shared variable when necessary

    eg:

    If you run the program in one JVM then you pick that program and pick it into another JVM, the program output is exactly the same.

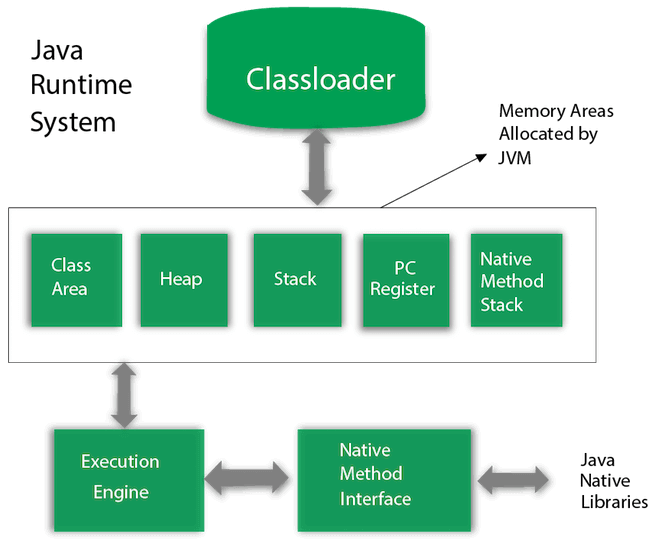
    Java Memory Model Structure

    • The Java Virtual Machine defines various run-time data areas that are used during execution of a program.
    Java Memory Management - GeeksforGeeks